Knowing the purpose of your backyard shed should be the first step in preparing it for the winter. As the preparation steps may vary depending on what you use it for.
If it’s mid winter and you decide you want to use your outdoor shed for seasonal projects, you may have a difficult time hauling coffee machines and heaters through the snow on a cold day.
Knowing what you want to use your backyard shed for will give you the time you need to improve it to fit each task. Furthermore, preparing your shed for the winter can save you a headache down the road from permanent damage.
Clean The Outside
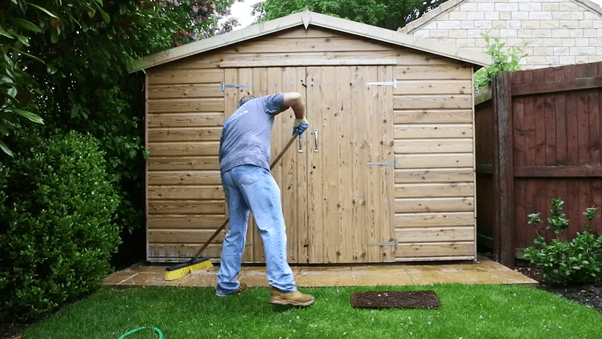
There could be leaves stuck between the panels or dirt crusted in the corners which can all wear down the material of your shed. So to start the winter preparations you should begin with cleaning your shed. Give it a good wash down with a garden hose and wash the windows by hand as well as the sills. Clean out any gutters on your shed and consider snapping on some covers. Be sure to check the roof and make sure nothing is lingering up there that has to be cleared out. Also be sure to check for any holes that might need to be patched before the wet season.
Don’t forget about the area around the shed. Lay down any mineral soil that will be used for the next season to prepare for it to grow come spring. Wash down sidewalks and other walking paths. Remove items sticking out of the ground such as sprinkler heads and lights.
Here are some areas where it’s important to pay extra attention to.
- Gutters. Make sure your gutters are firmly attached and clear of leaves and other debris. Don’t have gutters? At the very least, your shed roof should have generous eaves so that rainwater falls to the ground rather than trickling down the walls. You don’t want the cold weather to have an effect on your freshly stained shed.
Undirected runoff can create muddy puddles and may result in water collecting under your shed base, causing rot and decay. If you don’t have guttering, do consider installing it, not least because doing so enables you to collect rainwater which you can direct into a water butt for future use. You may also need to take additional measures to avoid flooding. An excellent drainage solution for small buildings is to build a French drain.
- Roof. Holes in the roof could allow water to drip inside your shed, potentially causing damage. Weak spots make your shed particularly vulnerable since the entire roof is prone to collapse if a big snowstorm hits.
- Windows and Doors. Door frames and wooden window frames, require regular maintenance to ensure the stay in good condition. Check and oil hinges, handles and locks, clear window vents of debris and check draft excluders and seals and replace as necessary. Broken or damaged panes? See our guide on how to replace a broken window before the weather gets too bad. Wash down wooden frames with hot soapy water before inspecting for paint blistering, water ingress and rot Pay particular attention to joints and end grains. Treat water penetration by removing paint to allow the wood to dry before treating with end grain sealant and repainting. Use a screwdriver to gently probe woodwork for rot. Dig out affected areas, treat with preservative and fill with exterior grade wood filler. Allow to dry then sand, prime and paint.
Taking Care of The Inside
Clear out your lawnmower, trimmer, weed whacker and any other powerful garden tool. These are the ones that are most typically forgotten. Make sure they aren’t holding any fuel. Run them out while preparing your yard and leave them empty and ready to be filled in the spring.
Make sure you wipe down and sanitize all tools. This is critical because it could have chemicals from your garden, fertilizer or compost still lingering there. You want it fresh to use in the new season, plus those chemicals can cause rust or damage to the metal/wood of the tools themselves. You also might also want to spray metal tools with a lubricant to prevent rusting.
Sweep floors, scrub surfaces, look for any signs of spiders or pests such as webs and nests and clear those out. Double check there are no holes in walls that will let critters find protection from the cold.
Store items on shelves. Open shelves and cabinets are suitable for storing flower pots, watering cans, fertilizer, pesticide, and cans of paint. They’re also useful for keeping power tools off the floor, where water from a stray leak could cause damage. Label the shelves to improve the overall organization in this space.
Store organic items in waterproof packaging. To prevent mold growth in soil and mulch, transfer to waterproof bags before storing them on a shelf in your shed.
Cover your tools and equipment with a tarp. This prevents dust from settling on them so you don’t have to clean your tools and equipment again next spring.
Insulate and Weatherstrip
Weatherstripping is a standard every year, when doors and windows can become unsealed and let in or out air. Fortunately, it doesn’t cost much to undertake this project, especially for something as small as a wooden shed. You are looking at about $30 per door and $15 per window, on average.
Additionally, if you add insulation you can continue to use your shed all winter long. It will also prevent any damage that can be caused by cold weather. If you live in a particularly cold climate your tools and other items stored in your wood shed can become cracked, chipped or broken. Insulation reduces the risk of that happening.
For more information on DIY projects check out the SummerStyle blog.
Share This Story!